Showing posts with label Scrivener. Show all posts

June 21, 2016

Lisa

SCRIVENER: Find And Change The Backup Location


(Windows version)


Scrivener creates backups, but it’s not always easy to find them on the computer. But there is a way to see the location and even change it inside of scrivener.


Finding & Changing Backup Location

STEP 1:

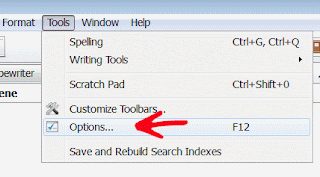
On top menu select: Tools/Options


STEP 2:

A box pops up.


On the left hand side, the last item is “Backup” (circled in red). Click on that.


STEP 3:

Off to the right, you will see a box circled in red. THIS is the location. You can even see that left of that red box it reads “Backup Location”.


To find your backups you can now trace the location typed in the red box with that on your PC.

You can also open up the folder location by clicking on “Open backup folder”.

If you want to change the backup location, click on the “choose” button to select a different folder to store your backups.

The backups are zip files which have the following structure:

NameOfScrivenerProject.bak
NameOfScrivenerProject.bak1
NameOfScrivenerProject.bak2

You can change the number of backups that you save (ex: bak, bak1, bak2 etc) by clicking on the menu that sits above the circled red box where the backup location is typed in. In this example I have selected:

“Only keep 5 most recent backups files”

Keep in mind that in this example of 5, if you have more than 5 backups, it will then overwrite your oldest version, which will be NameOfScrivenerProject.bak then NameOfScrivenerProject.bak1  and so on.

So check the date on the files to see the latest version saved.


Back Up Now

This option will allow you to do a quick backup right now. You’ll be able to select a new location and even change the name of your backup file from the default shown above.

STEP 4:

On menu bar: File/Back Up


STEP 5 (Either do A or B):

A: Back Up To


In the box, you can type any name you want. Just remember it. You can then select the location by clicking on the browse button.

B: Back Up Now

This option will backup to the location from STEP 3 and will use the same name designation (NameOfScrivenerProject.bak)


That’s it!


December 4, 2015

Lisa

Scrivener: Adding Pictures and Research Links (windows)


For many, the ability to store information in your scrivener project is a very handy functionality. 

For example, if you're writing a historical novel and you have a lot of research to keep track of, instead of filling up your browser bookmarks, you can save links inside scrivener that you can:

1) open up in your browser
2) view in your scrivener project w/o leaving it


So how do you create these links?


1) Go to the folder you are interested in storing the links. In this example, I have stored mine under "Research". Add  "New Text" 
 
I have already added one and called it "Planting Veggies". 


2) Click on the "References" icon


As you can see below. I already have links added. You can have more than one link. So you don't have to keep creating "New Text" to create additional items.


3) To add a link, select the "+" button. And then "Create External Reference".


4) For this example, I am adding a link from The Old Farmer's Almanac on the subject of lettuce. Add the title for your link (I added Lettuce) and then just below add the url.


5) Once you've done that, Right Click on the link you just added.


Choose "Open in Current Editor." The webpage will open up right there in scrivener.

If you select "Open link", your url will open up in your browser.

What if I wanted to add a link to a picture or some other file in my computer instead of from a webpage link?

 Go back to step 3. Instead of choosing "Create External Reference", choose "Look Up & Add External Reference"


Your file folder will open up for you to find and select your file. You will see a link to that file and it will have the same name as the file you just added.


What if I want to add a picture that will stay there (no link)?

1) Open up your file folder to the location of your picture. 

2) Drag and Drop directly onto your folder. In the example here, I used my Reference" folder.  

3) This will create a layer underneath your folder with a picture attached. The title will have the same name as your file.


Keep in mind that the more pictures you add the larger your project gets. Using links instead could be a better option.
  

November 24, 2015

Lisa

SCRIVENER: How to Convert Your Format (Windows)


How do you set the format (font & paragraphs) or change the format you already have?

We are all different and like to work in different fonts. So let’s say, the font is set to Courier New and you want to see your project in Verdana because it’s easier on your eyes. It’s not obvious how to do this.


Here are the steps:

1) Change the Default settings.

A)On the toolbar: TOOLS→OPTIONS


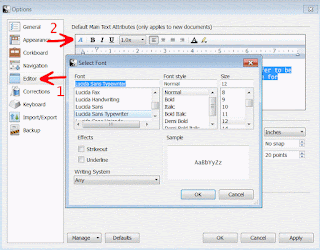
B) Once in options, select “Editor” then the “A”, which is located next to the “B” (Bold). This will change the font.


So now everything you type will have that new format.

But what about the text you already wrote. How to you convert that to the new format?

2) Under: Documents→Convert→Formatting to default Text Style

You should be able to convert everything. But in my case, either due to windows or my version, doing this only changed the one scene I was in, not the entire document.

My work around goes as follows:

A) On the left pane, MAKE SURE ALL FOLDERS ARE OPEN then select a scene. Do NOT select a folder. Once your scene is selected, you want to “select all”. 

If you don't have all the folders open when you "select all" then the scenes inside the closed folder might not be selected and won't change.

Either do a A or you go tot he toolbar Edit→Select All.


Now everything is selected.

B) Now you can do:
Documents→Convert→Formatting to default Text Style


Make your selections or don’t select anything and press “OK”


You are now done!